Showing posts with label wet n wild cosmetics. Show all posts

Tuesday, June 7, 2011

Emma Frost (January Jones) Makeup Tutorial as inspired by X Men First Class

I love movies and I love makeup. I am combining the two loves into one by emulating the looks I see in the movies. I do this often at home but would like to share what I do.

After seeing X Men First Class this weekend, I knew that Emma Frost was the character I wanted to model first. She wears frosty, diamond like glitter in the movie. This fits her well since she can transform into a diamond form. I also love glitter so this was very fun for me.


I decided to go in a different direction with this tutorial. I filmed myself applying the makeup on myself this morning, using a picture (posted below) as inspiration. I thought it may be more helpful to the vast majority of you to actually see me applying the makeup. Please let me know if the video route is better than the regular posts I've done in the past. Since I don't like the sound of my own voice (and neither does my flip video), they will be silent or with a music background.

I understand that the music I've chosen for the video doesn't have anything to do with X Men but it's what I have in my collection and what I enjoy listening to (Green Day and Three Days Grace today).

I have the finished product pictures below as well as the product listing. This look is, in my opinion, a modern version of 1960's-esque makeup and really wearable as far as glitter goes. You could always omit the glitter and replace it with a shimmery shade which would be more appropriate for work or school. As always, you don't have to use the same products I have. As long as the shades are similar, it should still work.

Oh, and I'm very new to the video game. So please forgive some patchy editing as well as not getting into the viewfinder appropriately at times.

The video.......


The pictures.......
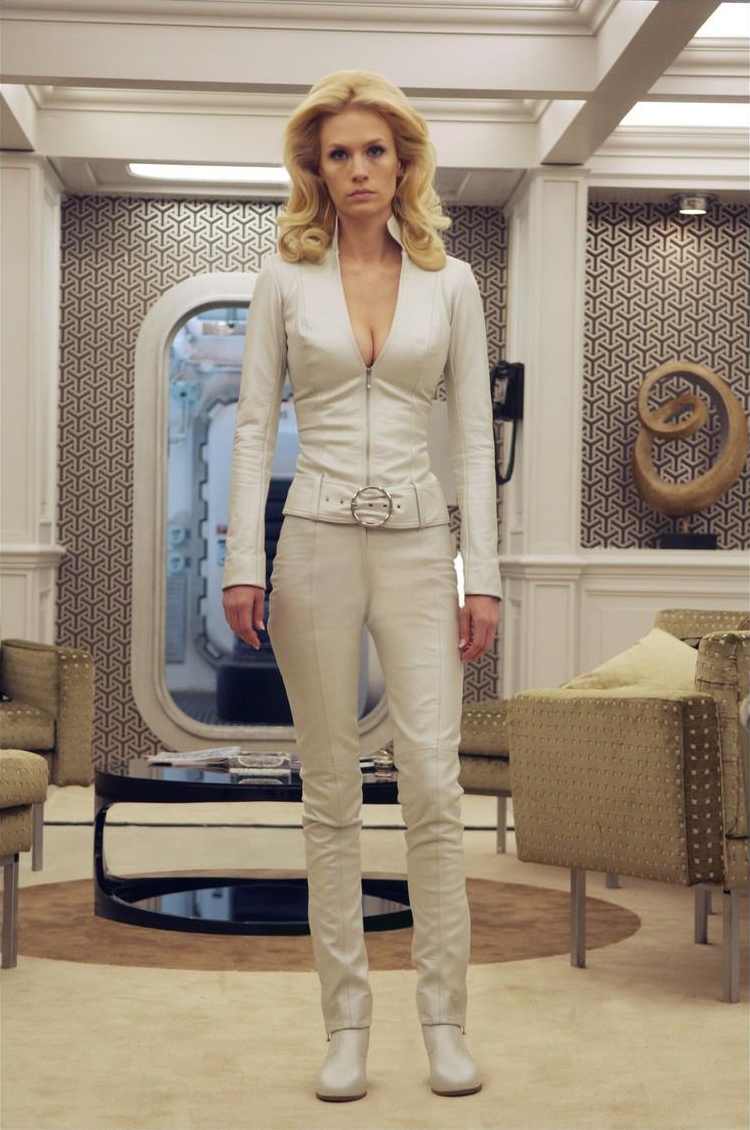
This is a picture of Emma Frost from the movie

Above are just the eyes.


Finished look above and below


Product Listing:


Eyes: E.L.F. eyeshadow primer, Bare Minerals High Shine Eyecolor in 'Ice', Wet N Wild comfort zone palette (2 shades), LA Splash Sealer/base, LA Splash Crystallized glitter in 'fuse', MAC's 'Phloof', Physician's Formula shimmer strips gel liner for 'hazel eyes' - black color used, maybelline volum' express one by one mascara in black, maybelline lash stiletto mascara in black


Face: Revlon colorstay foundation in 'buff', NYC color powder in 'translucent', physician's formula Happy Booster bronzer in 'light bronzer', MAC mineralize blush in 'giggly' (limited edition).


Lips: Cover girl lip perfection lipstick in 'sweetheart', nyx's mega shine lipgloss in 'sugar pie'


Retailers for the brands above:


Wet N' Wild - drugstores, Wal-Mart


Cover Girl - drugstores, Wal-Mart, Target, Ulta


MAC - MAC counters and PRO stores


Physician's Formula - drugstores, Target, Ulta


Revlon - drugstores, Wal-Mart, Target, Ulta


NYC color - drugstores (rite aid), Target


Bare Minerals - Ulta, Sephora, Bare Minerals Botiques, http://www.bareescentuals.com/


E.L.F. - Target, Kmart, http://www.eyeslipsface.com/


Maybelline - drugstores, Wal-Mart, Target


Wednesday, April 13, 2011

MAC Kitschmas and Shadowy Lady look/tutorial

This is a look I did a while ago, but I'm just now uploading. This is one of my favorite looks and I do it frequently. I am a big fan of pigments and MAC pigments are some of my favorites. This is using a shimmery pigment, kitschmas, as the base for everything. Hope you enjoy!! First off, the product listing. I have each product labeled with their corresponding name/shade in the picture above. 1. E.L.F. eyeshadow primer 2. Maybelline eye studio creme shadows in 'purple possibilities' - I used the pink shade on the right. IF you have MAC products, their paint pot in 'fresco rose' is also an awesome base. 3. NYX jumbo eye pencil in 'milk' 4. MAC pigment in Kitschmas 5. MAC four shade palette in 'shadowy lady' - colors used are 'shadowy lady' and 'smudged violet'. I know shadowy lady is permanent but I'm not sure about 'smudged violet' 6. Wet N' Wild Palette in 'lust' - I used the cream colored top right shade 7. NYX single eye shadow in 'matte black' 8. Milani eyetech liquid liner in 'black' 9. Milani easy liner for eyes glitter in 'black rocks' 10. NOT PICTURED - NYX studio liquid liner in 'extreme purple' 11. NOT PICTURED - mascara: l'oreal voluminous million lashes and maybellinee lash stiletto Lets go though how to do this! I really love this look because for brown eyed girls like me, the purples really bring out the color of your eyes. I love the shimmer in the pimgment and I like how this is more 'toned down' than my normal looks so I don't feel like I'm grabbing quite so much attention but still have a really pretty look. 1. prep eyes with primer, I used e.l.f. primer. Also, apply the eyeshadow bases. I used the maybelline purple possibilities as a drug store product and have also used the MAC paint pot in fresco rose and has pretty results. I prefer the MAC paint pot but the maybelline works almost as well for a lot less money. Put the pink color all over the lid. I used the NYX jumbo eye pencil in milk for the brow area and the inner corners of my eyes. 2. Apply the MAC kitschmas pigment wet over the entire lid. Use a flat shader type brush. I use the E.L.F. eyeshadow brush. 3. Apply the MAC shade, 'smudged violet' through the entire crease area for transition. 4. Apply MAC's 'shadowy lady' to the outer crease only. Put this on kinda heavy and then blend it out with a clean blending brush. 5. Apply NYX single eye shadow in 'matte black' (or any matte black, you can find these everywhere) to the outer 'V' of the eye and then blend that in with a clean blending brush. 6. Apply the Wet N Wild Lust palette shade (top right shade) to the brow bone and inner crease over where the NYX 'milk' shade lies. 7. Apply the milani eyetech liquid liner (or any other black liquid/gel eyeliner) to the top lash line. Place the NYX liquid liner in extreme purple to the outer half of the top lashes. Other good purple liquid liners are LASplash liquid liners, and Hard Candy Walk the Line liners. 8. Apply the milani easyliner for eyes glitter in 'black rocks' to the lower waterline. Other good water line pencils are physician's formula shimmer strips, Urban Decay 24/7 liner pencils, and revlon colorstay liner. 9. Curl lashes and apply mascara. I am still loving l'oreal voluminous million lashes for the first coat and maybelline lash stiletto for the second. And the finished lood with eyes closed....

Monday, March 28, 2011

How to Wear Red Eyshadow Right!

So, it's no secret that I love bold, bright ey color. So, red is fitting, right? The problem with red eyeshadow is that it can make you look sick or weird if you use it wrong. I feel as though I pulled it off pretty well if I don't say so myself. Here's the key -> don't use a lot and keep it grounded with neutrals. You can see from the picture below that I put the red eyshadow only on the inner parts of the eyelid and used darker colors on the majority of the lid and the outside of the lid. Also, picking a good red will help. I used the red chrome pigment from NYX. To darken the red a little further, I applied a dark eyebase to the entire eyelid. I used NYX's jumbo eye pencil in slate as the base and applied the red chrome pigment over that to the inner lid and NYX's black chrome pigment to the rest of the lid. Blend. Then, I used a taupe transition color over the entire crease before applying a matte black to the outer crease and a black glitter powder shadow (WNW's dupe for MAC's black tied)to the outer 'V'. ^^just the eyes
^^Finished look. See, I still look normal. :-)


Products used:

Eyes:

E.L.F. eyelid primer, NYX jumbo eye pencil in slate (base), NYX Dramatic Chromatic Pigment in Red, NYX Dramatic Chromatic Pigment in Black, Wet N' Wild's 8 pan palettes in Petal Pusher (browbone highlight and deep purple 'crease' shade) and Blue Had Me At Hello (black tied dupe), NYX single eyeshadow in black -matte, Milani eyetech liquid liner in black, milani easyliner glitter liner in black rocks (waterline), maybelline lash stiletto, l'oreal voluminous million lashes

FAce:

MAC mineralize skinfinish in Pink Power, Cover Girl lip perfection lipstick in Sweetheart.

Thursday, February 10, 2011

Jesse's Girl Eyedust: Applying pigments wet!

So, I like color, most of you know that if you know me. However, though it may be hard to believe, I've never applied my minerals/pigments wet! So, I decided to do that today. I love Jesse's Girl eyedusts as the best cheap pigments, but I've had them fade/crease without using adequate primer/base so I decided to see how they would do wet. All the products used in this tutorial are drugstore and therefore pretty affordable. You can get great color for a small price!!! (Jesse's Girl can be found at Rite Aid and online)

Lets get to it..........


This is the finished look on my eyes. The look is a green/blue/black mix. Not too dark, more bold.


The finished look overall.


So, to start, of course, always use a primer. Any primer will work. For the eyedusts (and bare minerals loose shadows), I use BOTH a primer and a cream shadow for extra staying power. This did prevent the Jesse's girl from creasing, btw. I use the skin tone pink here in the Revlon Illuminance cream pallette.


Unfortunately, once you open the package of Jesse's girl, you loose the color name! I believe this is called 'majestic green'. This is how the outside of the packaging looks.


To apply loose pigments, place some color in the lid and then dip your brush into it. You can use a brush specially designed for loose shadow (bare minerals line) or any stiff shadow brush. Here, I'm using the E.L.F. eyeshadow brush.


To apply the shadows wet, the easiest technique is to buy an empty sprayer bottle (at target or anywhere else) and use it to spray the brush with water. I give the brush two sprays only so I don't overwet the brush and then pack on the shadow. Pat the shadow on, don't rub. If you need more color, redip the brush -> you shouldn't have to rewet again.


Now for the crease color. I've chosen "blackstar blue" from Jesse's girl (i just happened to remember that name for some reason). We will apply this dry since it's going into the crease. I used my Essence of Beauty crease brush to pick up the color.

Pick up the color as you do with any other mineral -> place color in lid, tap of excess and apply to crease and outer corner.


Now, blend the crease color out and blend it into the green a bit. I'm using my Kat Von D clean crease brush to blend.


I'm turning to Wet N' Wild's sweet as candy color trio for the browbone color. I'm using the lightest color in this pallette for the browbone.


I always like a little extra depth, so I'm using my essence of beauty brush (came in the crease brush duo set -> this one is smaller than the other crease brush I use). The reason I'm using the smaller crease brush is for precision; I just want the matte black in the outer V and it's easier to use a smaller brush for this application. The color I'm using is the matte black in Wet N' Wild's Greed pallette.


Now, I line my eyes with liquid liner everyday. Again, you don't have to use liquid; you can use a gel or pencil. However, a liquid or gel will show up better against the colors we used. I'm using maybelline's ultra liner for this. I wing out the liner just a little on the upper lashline only.


For the lower lashline, liquid is typically too harsh. So, I'm using two colors. For the outer 3/4 of the lower lashline, I'm using L'oreal HIP's color chrome eyeliner. This is just a black eyeliner but I like HIP for staying power.


For the inner 1/4 of the lower lashline that is yet unlined, I'm using Revlon's colorstay liner in Teal.


I want to reinforce that pencil eyeliner to make it stay longer, so I'm using the same matte black I used before from Wet N' Wild's Greed pallette to place over the liner. For lining with shadow, my favorite brush ever is Bare Minerals Soft focus liner brush. These brushes are made to place shadow on the lashline so they are tops for this purpose. I only apply the black to the portion of the lower lashline that we used the black pencil for.


To finish off the look, I use Revlon's super lustrous lip gloss. The color I'm using is in 'pink whisper' (see below). I LOVE revlon's super lustrous glosses. I'd compare the super lustrous to the high end bare minreals glosses I own.


Wednesday, February 9, 2011

The best of Cheap!!

I've been wanting to do this for a while now. I've always appreciated the quality of high end products and I still do. However, in the past, I feel I've underestimated the quality and potential of cheaper products. I've written off cheap items as not having quality do to the lack of an inflated price. I have discovered recently, that If you read reviews and look hard enough, you will find those drugstore gems for great prices. What I'm doing with this post is comparing my favorite drugstore products to my favorite high end products of similar type. Let me know if you have anything to add to this list!

It all started with a $1.00 eyshadow brush from E.L.F.......

FOUNDATION
Best high end: Bare Minerals

Best Drugstore: Revlon Colorstay ties with Revlon Photoready

CONCEALER
Best High End: Merle Norman Coverup

Best Drugstore: Covergirl smoothers concealer (redness)
Maybelline 24 hour superstay (undereye circles)

EYESHADOW BASE:
Best High End: Urban Decay Primer Potion

Best Drugstore: L'oreal Decrease (in fact, I'd call decrease a dupe for UDPP)

BRIGHT EYESHADOW:
Best High End: Urban Decay (entire line)

Best Drugstore: Wet N Wild

EVERYDAY EYESHADOW:
Best High End: Too Faced Natural Eye Pallette

Best Drugstore: NYX champagne and caviar pallette

LOOSE EYESHADOW:
Best High end: Bare Minerals (entire line)

Best Drugstore: Jesse's Girl Eyedusts

GLITTER:
Best High End: Urban Decay's midnight cowboy line

Best Drugstore: NYX candy glitter liner and cream pallettes

MASCARA:
Best High End: Buxom Lash mascara in black

Best Drugstore: Maybelline's Lash Stilletto and L'oreal Voluminous Million Lashes

LIPGLOSS:
Best High End: Buxom and Bare Minerals lip gloss

Best Drugstore: Revlon super Lustrous lip gloss

BRONZER:
Best High End: Too Faced in Snow Bunny

Best Drugstore: Physician's Formula Happy Booster

NAIL POLISH:
Best High End: OPI (entire line) -> my favorite color is lincoln park after dark

Best Drugstore: Sinful Colors (avaliable at Walgreens)

MAKEUP BRUSHES:
Best High End: Merle Norman ( my foundation brush has lasted for 7 years!) and Kat Von D (sephora only)

Best Drugstore: E.L.F. ,Sonia Kashuk (Target for both), and Eco Tools

EYELINER:
Best High End: Urban Decay 24/7 glide on eye pencils and Buxom liners

Best Drugstore: NYX jumbo eye pencils, E.L.F. liquid liner, physicians formula shimmer strips liners.

MAKEUP SETTING SPRAY:
Only one and it's high end: Urban Decay All Nighter setting spray

FOUNDATION PRIMER:
Best High End: Bare Minerals Prime Time

Best Drugstore: L'oreal Magic Pefecting Base

PALLETTE:
Best High End: Urban Decay's Naked Pallette

Best Drugstore: Wet N Wild's color Icon pallettes *favorite is Lust*

PERFUME:
Best High End: Viva La Juicy

Best Drugstore: Britney spears circus fantasy

Thursday, January 27, 2011

Another Wet N Wild Look - 'Lust' color Icon palette

This look is another from my new favorite cheap yet awesome makeup, Wet N' Wild. I had no clue how good their products were until recently as I'd always written them off being so cheap. After using great E.L.F. products, my eyes were opened to the world of good quality, budget friendly makeup that DOES exist. This look can be done with all drugstore products.


First, use a primer (any will do). I reccomend l'oreal's decrease for drugstore and Urban Decay Primer Potion for prestige. For most dark looks, I prefer to use a primer AND a cream base as I believe it helps my makeup to stick better without creasing. The above cream pallette is revlon's creme illuminance in seashells. I use the color to the far left but any color that matches your skintone will work. Apply the primer all over the lid and place the creme base on the lid and crease.


As I have mentioned before, the color Icon pallettes have one matte side (left) and one shimmer side. You can mix the two types of shadow up or stick with one. I am going to use the matte deep purple for my lid but use the shimmers in the look as well. Mixing of matte and shimmer produces a cool effect. Put the color highlighted above all over the lid with a clean eyeshadow brush. I'm using my favorite eyeshadow brush here, E.L.F.'s shadow brush ($1 at target and online).


Next, we will use the midtone shimmer highlighted above to put in the crease. This is a dark look (can you tell I like dark makeup?). When a dark color is used all over the lid, a lighter color needs to be used in the crease. This is the oppositive of an everyday, typical look. Such a look would call for the lighter color on the lid and the darker in the crease. Just go with me here though. :-) Use your crease brush to apply that color to the crease being careful not to go over too much of the lid color. Here, my crease brush is CVS's exclusive brand, essence of beauty. The essence of beauty crease brush is my favorite for detailed work because it's so small.


Next, we blend it all together (before the highlight color is applied so it doesn't look muddy). I am using Kat Von D's crease brush to blend. Make sure you use a fluffy brush that is clean for this. I love this brush for blending because it's soft and does it very nicely. To blend, first blend the crease color out towards the brows and then lightly blend the crease color in with the lid color; but, be careful not to erase your lid color.


Finally, we will use the lightest shimmer as a highlight right under the brow arch and in the inner corners of the eyes. blend this with a large fluffy brush. Here, I'm using Sonia Kashuk's eyeshadow brush (exclusively sold at Target).


It's eyeliner time. This week, I picked up a new purple eyeliner as I know I'll run out of my cherished Urban Decay soon. This is the physician's formula shimmer liners that come in a set of three. I am using the set for brown eyes. In the set, there is a black, a purple, and a brown variety. I'm using the purple variety here to line my lower lash line. You can skip this step or use a black liner if you prefer. I like purple because it's not as harsh with the dark looks and it brings out brown eyes well.


I love liquid liner, so I use it pretty much exclusively when I do dark eyeshadows. I feel that the liquid has a higher contrast against the dark eyeshadow and it lasts longer. Here I'm using my favorite liquid liner, E.L.F.'s liquid liner in black ($1 at target and online). You can use a gel or a pencil if you don't have confidence with a liquid liner.


Next, curl those lashes and finish off with mascara. I'm trying out a new one I just got - Rimmel's Glam Eyes. I do like it. It lenthens and seperates well which is suprising considering how small the brush is. I feel it has good precision though. See the picture below to see a picture of the actual brush.


Rimmel glam eyes brush. Not a bad mascara - it does go head to head with Maybelline's volum' express but I can't decide which one I like better. We'll have to see....
This is the overall finished look (whole face).


Just the eyes. You can see the two different colors here and the blending.
By the way, this look lasted for hours during class and errands. Primers work!! I also reccomend a makeup setting spray. I love Urban Decay's All Nighter spray.


Monday, January 24, 2011

Wet N Wild Craze Nail Polish Swatch and Review

I have recently discovered the amazing quality of the Wet N Wild products. It's pretty amazing and cool that a makeup so budget friendly comes up with consistent, high quality cosmetics. Oh a recent trip to Rite Aid, I picked up one of the Wet N Wild Craze colors in one that struck my eye, Morbid. It's a dark green that appears black in low light. The nail polish went on easily, stayed as well as OPI, and and looked awesome on my nails. I totally reccomend this line.


The packaging and back of the label with color and ingredients. The packaging is totally cute, may I add.
Front of the bottle. The bottle is a little on the small size at 0.34 ounces, but it only costs 1.99. Plus, it takes forever to go through a bottle of OPI, so this is probably just about the right size.

Swatched on my nails. This is one of my new favorite colors.