Tuesday, June 7, 2011

Emma Frost (January Jones) Makeup Tutorial as inspired by X Men First Class

I love movies and I love makeup. I am combining the two loves into one by emulating the looks I see in the movies. I do this often at home but would like to share what I do.

After seeing X Men First Class this weekend, I knew that Emma Frost was the character I wanted to model first. She wears frosty, diamond like glitter in the movie. This fits her well since she can transform into a diamond form. I also love glitter so this was very fun for me.


I decided to go in a different direction with this tutorial. I filmed myself applying the makeup on myself this morning, using a picture (posted below) as inspiration. I thought it may be more helpful to the vast majority of you to actually see me applying the makeup. Please let me know if the video route is better than the regular posts I've done in the past. Since I don't like the sound of my own voice (and neither does my flip video), they will be silent or with a music background.

I understand that the music I've chosen for the video doesn't have anything to do with X Men but it's what I have in my collection and what I enjoy listening to (Green Day and Three Days Grace today).

I have the finished product pictures below as well as the product listing. This look is, in my opinion, a modern version of 1960's-esque makeup and really wearable as far as glitter goes. You could always omit the glitter and replace it with a shimmery shade which would be more appropriate for work or school. As always, you don't have to use the same products I have. As long as the shades are similar, it should still work.

Oh, and I'm very new to the video game. So please forgive some patchy editing as well as not getting into the viewfinder appropriately at times.

The video.......


The pictures.......
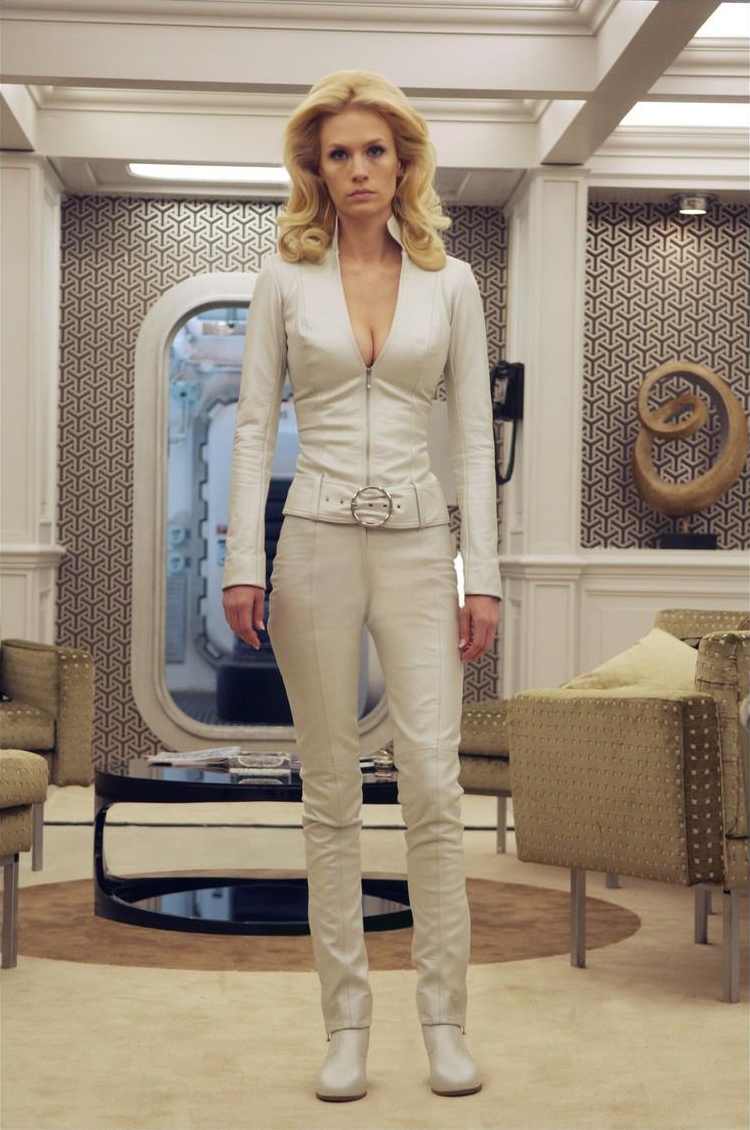
This is a picture of Emma Frost from the movie

Above are just the eyes.


Finished look above and below


Product Listing:


Eyes: E.L.F. eyeshadow primer, Bare Minerals High Shine Eyecolor in 'Ice', Wet N Wild comfort zone palette (2 shades), LA Splash Sealer/base, LA Splash Crystallized glitter in 'fuse', MAC's 'Phloof', Physician's Formula shimmer strips gel liner for 'hazel eyes' - black color used, maybelline volum' express one by one mascara in black, maybelline lash stiletto mascara in black


Face: Revlon colorstay foundation in 'buff', NYC color powder in 'translucent', physician's formula Happy Booster bronzer in 'light bronzer', MAC mineralize blush in 'giggly' (limited edition).


Lips: Cover girl lip perfection lipstick in 'sweetheart', nyx's mega shine lipgloss in 'sugar pie'


Retailers for the brands above:


Wet N' Wild - drugstores, Wal-Mart


Cover Girl - drugstores, Wal-Mart, Target, Ulta


MAC - MAC counters and PRO stores


Physician's Formula - drugstores, Target, Ulta


Revlon - drugstores, Wal-Mart, Target, Ulta


NYC color - drugstores (rite aid), Target


Bare Minerals - Ulta, Sephora, Bare Minerals Botiques, http://www.bareescentuals.com/


E.L.F. - Target, Kmart, http://www.eyeslipsface.com/


Maybelline - drugstores, Wal-Mart, Target


Wednesday, May 25, 2011

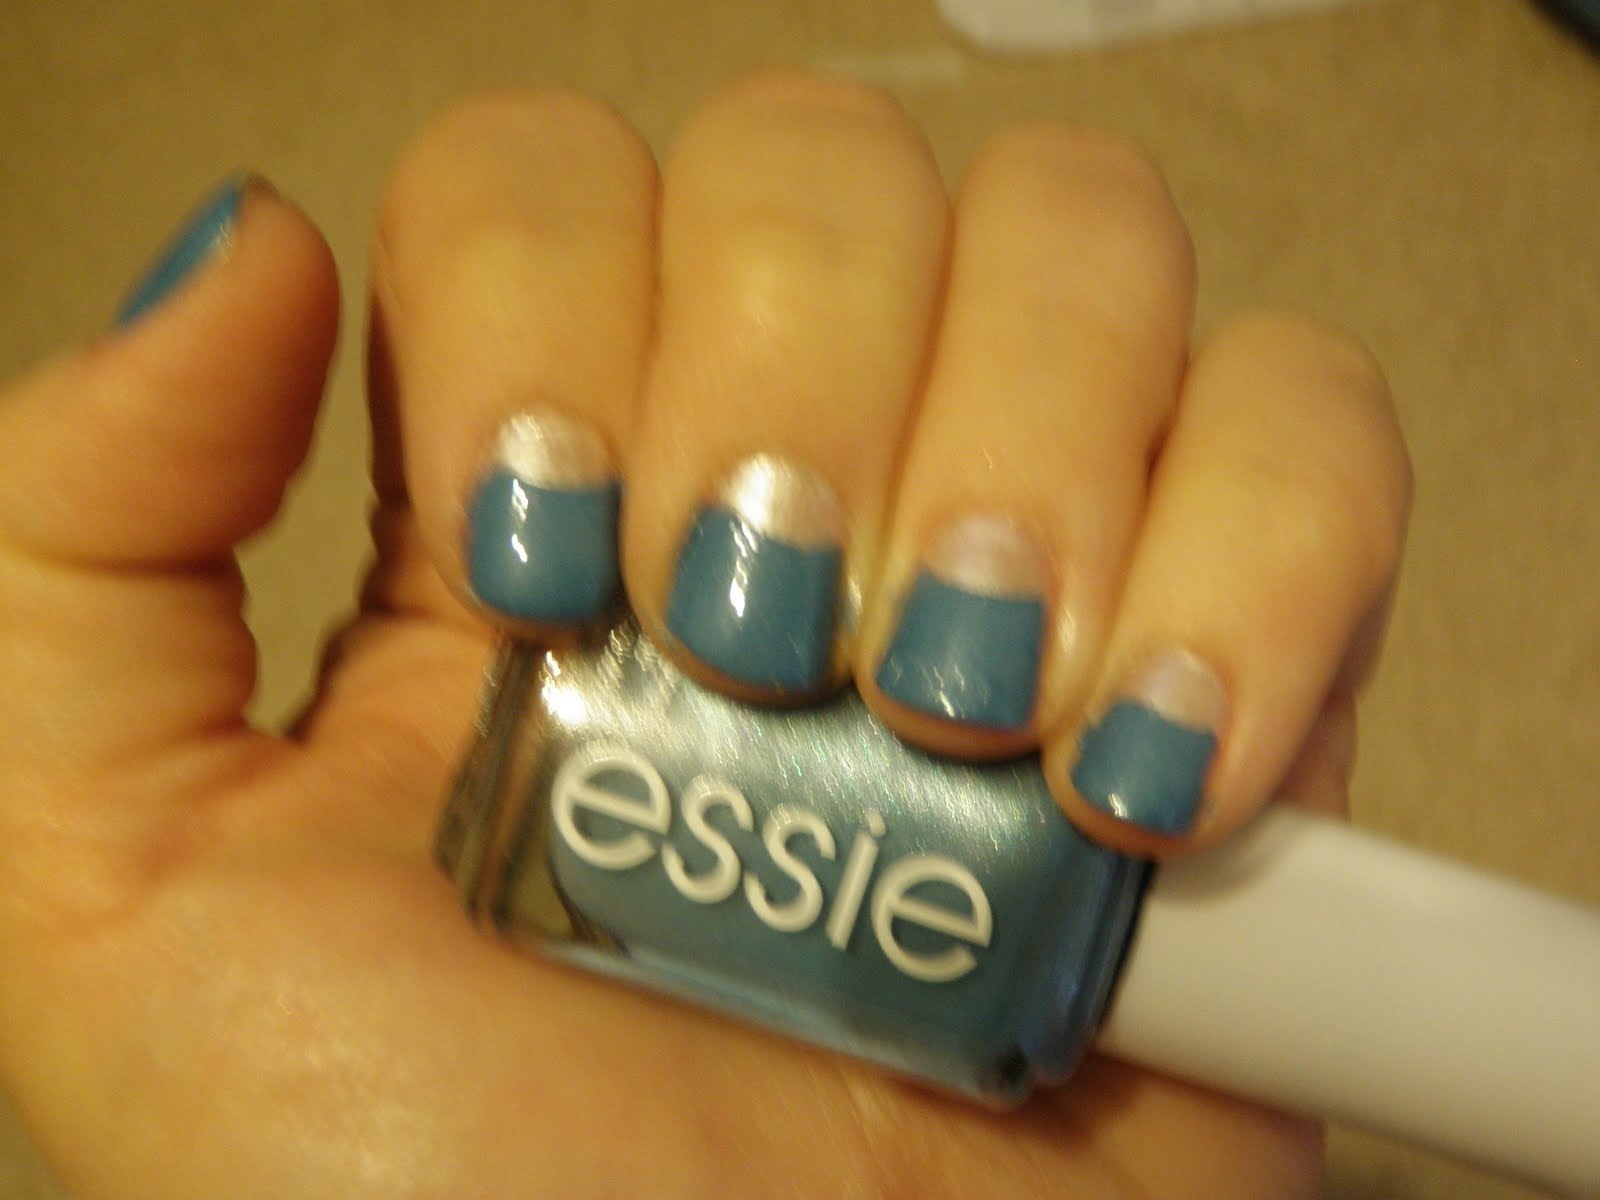
Half Moon Manicure with Essie + How to

So, I don't know about everyone else, but I am loving the new half moon manicure trend. But, if you're like me, you want to know how to do it yourself. Well, I've tried two different techniques to do this. The first is the free hand technique with a nail brush. This is where you place the light coat on your nails first and then dip a small nail art brush (or small acrylic brush) into the darker color to draw the moons. Then you use the rest of the darker color to fill in. This is difficult for me despite my ability to use my left hand pretty well. So, what to do?

I found via youtube that another technique is to use binder reinforcements to create the moon shape and paint over it as a guide. That, my friends, is what I did here. However, I found that it's easier to cut the binder reinforcements in half to make it easier to stick them to your nails.

So, this is what you do:
1. Paint nails all over with a base color. I prefer to make this a light color since you're going to be going over it later. This is the color of the 'moons'.

2. place the reinforcements on, one hand at a time, and paint over in your top color. I would advise that these colors have good contrast to make it stand out more.

3. remove reinforcements and add a top coat. done!

Below is my finished product. I have Essie's 'imported bubbly' on the bottom and essie's 'coat azure' on the top.


Sorry for the blurry pic below, but it's a good close up of the moons.


Wednesday, May 11, 2011

Organix Ever Straight Brazilian Keratin Therapy Review

Another beauty product review! Yay!

So, Keratin therapy is really 'in' right now. Keratin treatments at the salon are very pricey though and everyone's looking for something that will give semi-permanent straightening at home. I personally have tried a pricier keratin product that I did enjoy so when this went BOGO at rite aid, I decided to try it. I've only used the product once thus far, but I'll give you my first impressions.

I also want to point out that I have naturally straight hair. I use the keratin products for extra managability in straightening my hair. (it's naturally straight, but I still have to blow dry and/or straight iron to get it totally straight)

In Shower Experience: I LOVE the way this stuff smells! It smells like pina colada-ish suntan lotion. I don't know if I"m alone here, but I love the smell of Hawaiian tropic esque lotion.
The one thing I noticed in-shower was that it was lacking in lather. You really have to add extra water to this to get a good later. And, if you're like me, you figure the more lather, the more clean your hair is getting. So, this was a bit unsettling. After I did get a lather worked up and rinsed the product, I noticed that my hair felt dry and tangly. Thank goodness I bought the conditioner too! However, from what I understand, the drying/lack of lather problem is common to sulfate free shampoos/conditioners. This product is sulfate free which is great for us color treated folks......so, I do appreciate that.
The conditioner goes on and it does make my hair feel smoother in the shower, so I'm greatly relieved.

Out of Shower experience:
So, my hair was more difficult to brush through due to it being a bit more tangly and drier, but I was able to work through this without much difficulty. The perk to the shampoo being a bit drying is that your hair dries faster than it does with more moisturizing brands, so this is good for me.
During styling, I did notice my hair was easier to blow dry straight and it needed less flat ironing. When I was done, my hair was perfectly straight, so I was pleased. I'm working on day two hair now and it's still straight, so it did a good job in this department.
There is a styling product that goes with this line that I didn't purchase. The bottle claims that you get better results when you use that product. I can't speak for that but would be interested in hearing from any of you who did purchase the styling product.

Bottom line: I enjoy the smell of the product and the way it makes my hair more manageable and straight. Does this work miracles to straighten hair? Nah......but it does make it more easy to style/straighten. I'd be interested to hear from you curly haired girls and let me know how this worked for you. Would I repurchase? Yes - I'm always looking for shampoos that will preserve my color and the sulfate free options here are great for me.

Next, I'm going to try the Moroccan argan oil products in the organix line. I'll let you know how those fare as well.

Saturday, April 30, 2011

MAC Starviolet look

Thought I'd grace you with another look. I'm trying to use different colors to create a variety of looks. So, I dipped into my MAC palette and found some shades I had yet to use. I decided to do something with pink and teal. The camera didn't pick up the teal like I wanted it too but it's there.

How to do it:
1. Eyeshadow/Brows: Urban decay primer potion all over, MAC paint pot in 'fresco rose' to the lid. MAC's 'pink venus' to the inner eye lid and MAC's 'star violet' to the outer lid. MAC's 'plumage' to the crease and blended. Hightlight to the brow bone is MAC's 'lightfall'. Finally, MAC's 'carbon' to the outer 'V'. I also applied a little bit of MAC's 'phloof!' to the tear duct area.
MAC's 'espresso' goes on the brows with a liner brush to define.

2. Eye Liner/Lashes: The top lashline gets a black, gel eyeliner. I don't have MAC's 'blacktrack' so I used maybelline's gel liner in 'blackest black'. I applied MAC's 'carbon' on top of the gel to set it and smoke it out a bit. Physician's formula shimmer strips pencil liner (the purple one) goes on to the waterline and L'oreal's HIP color chome eyeliner in 'black shock' to the actual lashline, again, with carbon applied on top with a liner brush for some smoke and depth. My eyelashes are culed and then I apply both a volumizing and lengthening mascara to the top and the lengthening mascara solo to the bottom.

3. Face: Revlon photoread foundation in 'vanilla', Revlon's photoready concealer in 'fair', and Revlon's photoready translucent powder to finsih.

4. Blush: I used 'giggly' by MAC to the cheeckbones and contoured with Too Faced's 'sunbunny' to the hollows. I blended all this out with a bronzer brush.

5. Lips: MAC 'mile' lipstick + MAC's lip gelee in 'Fashion flower'


I do want to note for anyone interested, that the Fashion Flower colors I used are out with the current collection and are most likely limited editions. Freso Rose paintpot isn't permanent from what I understand but all other shadows I used should be permanent.


Tuesday, April 26, 2011

"what do you do to your skin?" - My reccomendations for facial care

So, I get this alot.....
"your skin is so pretty! what do you do?"

Now, I'm not complaining about the compliments, I love hearing this. But, I wanted to share my experience to let you all know how you can have the skin you always wanted.

1.) Get thee to a dermatologist!!!
*I claim no fame to my complexion, at all! I have what I would describe as finicky skin.....skin that is prone to breakouts and dryness at the same time. I finally wisened up and went to the dermatologist when I started really struggling with acne in college. I have been a loyal patient ever since. My skin has long cleared since 2001, but I still go to my derm. Why? He keeps my skin regimen appropriate for me and that keeps my skin performing at its best. So, please consider going to get professional help if you feel you just can't get a handle on your skin issues.

2.) Makeup works wonders
Again, I always credit not only my derm but my current foundation to my skin looking nice. I do have a red-undertoned complexion and I have broken capillaries on my face, so foundation is a must. You can certainly wear foundation without looking like you're wearing anything at all. Go to a department store and get color matched. After that you can try to conquer the drugstore foundation aisles with your matching color in hand for comparisson. My foundation routine varies by season, and mood but I always wear it. It doesn't take me but 5 minutes to apply and it evens everything out and makes me look not so scary.

3.) Moisturize and protect
I use a moisturizer everyday prior to foundation. I started doing this to give a more even canvas for foundation application but I found that the moisture was much needed. Also, a moist face looks younger - this we know. I say protect because SPF is the one thing you can do to prevent aging (among the other things SPF does for us) and most moisturizers have an SPF built in. Right now though, I'm using the Neutrogena Baby SPF 60 under my foundation. Since it's made with natural sunscreens (also important - titanium and zinc), it can give a whitish cast to the skin. But, with foundation it's not noticeable and I feel comfortable knowing my skin is well protected in the summers here.

4.) Maintain
Treat your skin nicely. Make sure you nuture it. And make sure to keep up whatever works for you. In my experience with my skin, if I stop doing what works, it quickly goes back to being finicky.


So, that's about it. So that everyone knows what I use, I'll list my skincare routine below. I do reccomend the Over the counter products I use as I wouldn't use them if I didn't like them. But, again, the core of my routine is the derm prescibed regimen.

My Skincare:
Cleansing: l'oreal go 360 clean exfoliating scrub
Treating: derm prescribed topical antibiotic and topical acid based acne preventative
**I do not want to reveal the exact names on this forum as I don't want to endorse/fail to endorse any particular prescription product.**
Makeup remover:Neutrogena eye makeup remover for eye products
SPF: neutrogena pure and free baby SPF 60
Moisturizer: Oil of Olay complete moisture cream
Foundation: Revlon Colorstay in Buff

Wednesday, April 13, 2011

MAC Kitschmas and Shadowy Lady look/tutorial

This is a look I did a while ago, but I'm just now uploading. This is one of my favorite looks and I do it frequently. I am a big fan of pigments and MAC pigments are some of my favorites. This is using a shimmery pigment, kitschmas, as the base for everything. Hope you enjoy!! First off, the product listing. I have each product labeled with their corresponding name/shade in the picture above. 1. E.L.F. eyeshadow primer 2. Maybelline eye studio creme shadows in 'purple possibilities' - I used the pink shade on the right. IF you have MAC products, their paint pot in 'fresco rose' is also an awesome base. 3. NYX jumbo eye pencil in 'milk' 4. MAC pigment in Kitschmas 5. MAC four shade palette in 'shadowy lady' - colors used are 'shadowy lady' and 'smudged violet'. I know shadowy lady is permanent but I'm not sure about 'smudged violet' 6. Wet N' Wild Palette in 'lust' - I used the cream colored top right shade 7. NYX single eye shadow in 'matte black' 8. Milani eyetech liquid liner in 'black' 9. Milani easy liner for eyes glitter in 'black rocks' 10. NOT PICTURED - NYX studio liquid liner in 'extreme purple' 11. NOT PICTURED - mascara: l'oreal voluminous million lashes and maybellinee lash stiletto Lets go though how to do this! I really love this look because for brown eyed girls like me, the purples really bring out the color of your eyes. I love the shimmer in the pimgment and I like how this is more 'toned down' than my normal looks so I don't feel like I'm grabbing quite so much attention but still have a really pretty look. 1. prep eyes with primer, I used e.l.f. primer. Also, apply the eyeshadow bases. I used the maybelline purple possibilities as a drug store product and have also used the MAC paint pot in fresco rose and has pretty results. I prefer the MAC paint pot but the maybelline works almost as well for a lot less money. Put the pink color all over the lid. I used the NYX jumbo eye pencil in milk for the brow area and the inner corners of my eyes. 2. Apply the MAC kitschmas pigment wet over the entire lid. Use a flat shader type brush. I use the E.L.F. eyeshadow brush. 3. Apply the MAC shade, 'smudged violet' through the entire crease area for transition. 4. Apply MAC's 'shadowy lady' to the outer crease only. Put this on kinda heavy and then blend it out with a clean blending brush. 5. Apply NYX single eye shadow in 'matte black' (or any matte black, you can find these everywhere) to the outer 'V' of the eye and then blend that in with a clean blending brush. 6. Apply the Wet N Wild Lust palette shade (top right shade) to the brow bone and inner crease over where the NYX 'milk' shade lies. 7. Apply the milani eyetech liquid liner (or any other black liquid/gel eyeliner) to the top lash line. Place the NYX liquid liner in extreme purple to the outer half of the top lashes. Other good purple liquid liners are LASplash liquid liners, and Hard Candy Walk the Line liners. 8. Apply the milani easyliner for eyes glitter in 'black rocks' to the lower waterline. Other good water line pencils are physician's formula shimmer strips, Urban Decay 24/7 liner pencils, and revlon colorstay liner. 9. Curl lashes and apply mascara. I am still loving l'oreal voluminous million lashes for the first coat and maybelline lash stiletto for the second. And the finished lood with eyes closed....

Friday, April 8, 2011

My Fast Face! Using MAC products.

So, this post is intended to deliver a more realistic makeup look. Most days, we don't have time to spend 20 minutes on awesome looking, glittered-out, smokin' eyes. This is how I look when I don't have time or plan to reapply more makeup later. You don't need a lot of products to do this and most of what I used is MAC. All the products I used are pictured below - that's pretty much all I used (except my foundation/powder/blush). I think this whole look took 15 minutes for the whole face, tops.


Pictured are all the products AND brushes used. And they are....


1. Sephora eyeliner brush


2. Eco Tools concealer brush


3. NYX eyeliner pencil in 'white pearl'


4. MAC paint pot in 'bare study' (permanent line)


5. MAC fluidline in 'waveline' (permanent line)


6. eyelash curler


7. NYX round lipstick in 'galaxy' -> LOVE this color!!!


8. l'oreal voluminous million lashes mascara


9. Maybelline lash stiletto mascara


** Also used on face: Stila convertible color in 'lilium'; revlon colorstay in buff foundation; revlon photoread concealer in fair; revlon colorstay powder in fair.

So, for the eyes, all I did was use the MAC paintpot in bare study to the entire eye and brow area (using the eco tools concealer brush). This color is awesome. It's a shimmery champagne color and since it's a paintpot (doubles as base and cream base), it stays on forever. That's all for the eye color. Now, to line my eyes, I used the MAC fluidline to create a winged toplash line (using the sephora brush). I realize my wings aren't even and I'm working on that!!!! However, the uneven wings are not very noticeable with closed eyes. For the bottom lashline, I used the NYX pencil to line the water line. Since this is a white color, it gives you a more awake look. Curl lashes and apply mascara - you're done!! For the lips, I used just the NYX lipstick in galaxy. I only applied a little blush to the apples of my cheeks and that was using the stila convertible color. That's it!