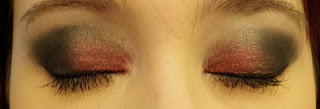
 ^^just the eyes
 Monday, March 28, 2011
How to Wear Red Eyshadow Right!
 ^^just the eyes
 Essie: Cute as a button Swatch and Review
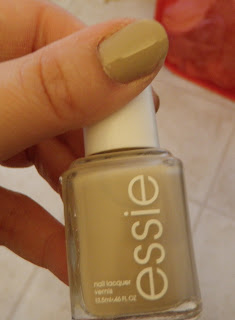
 ^^The bottle itself
 Saturday, March 26, 2011
Sucker Punch Hair and Makeup Tutorial: Baby Doll


A.) FACE
1.) You want your skin to look creamy and pale with a touch of pink blush. This is easy for me as I'm already really pale. So, apply foundation with concealer. I used a highlighter to bring more light to the center of my face. I used E.L.F.'s shimmering facial whip in spotlight (product number 4 below). I applied this cream highlighter to the bridge of my nose, my forehead, chin, and cupid's bow. Then, I applied my powder to set this and the foundation.
2.) Blush: This needs to be pink and rosy. Baby doll's do not wear bronzer!! I used l'oreal's True Match Blush in c3-4, tender rose (product 10). I applied this sort of liberally to the apples of my cheeks.
3.) Lips: You want your lips to be nude/neutral. I used revlon colorstay lip liner in natural (product 15) to line my lips and applied maybelline's color sensational lip stick in sugared almond (product 12). For gloss, I used NYX's mega shine lipgloss in baby rose (product 13).
B.) EYES
1.) Prime your eyes with any primer. I used E.L.F.'s primer (product 1).
2.) Apply cream bases. I used NYX's jumbo eye pencil in milk (product 2) to the browbone and Wet N' Wild's Idol Eyes creme shadow in 130 Pixie (product 3) for the entire lid. Blend those out with a finger or creme shadow brush.
3.) Apply a light, shimmery shade to the entire lid. I am using E.L.F.'s mineral eyeshadow in Angelic (product 5). I applied this wet to the entire eyelid and brow.
4.) Apply a taupe color to the crease in a defined manner. It's not an exact cut crease but, it's not a very blended look. I used Wet N' Wild's single eyeshadow in Nutty (product 9). I applied this with a flat shader brush so that it would be more precise.
5) Now, to add some definition to the crease, I took a darker brown and went over the line I just created, working from the outside in. I do this to make sure the darkest colors are in the outside of the lid. I also applied this with a flat shader brush to ensure precision. For this, I used the Wet N Wild 8 pan shadow palette in comfort zone. I used the bottom left shade (product 11).
6) I took a small blending brush and blended the two colors together and blended them out a tad, but not too much as I still want to keep precision in the color.
7.) Baby doll uses a lot of eyeliner on the top lashes with a cat eye. I realize my cat eye is not even here, but I'm working on that. I used a gel liner for this. Using maybelline's blackest black (product 6) and and eyeliner brush, I applied it thicker at the outer eye and winged it.
8.) For the lower lashline, I didn't see very much if any liner, so I used a golden eyeliner pencil to give some reflection but not depth. I used Urban Decays 24/7 pencil in el dorado (product 14). I applied to this to entire lower lashline very close to the lashes.
9.) Curl lashes and apply mascara. I'm using my tried and true everyday combo, l'oreal voluminous million lashes (product 8) first and then maybelline's lash stiletto (product 7) as a second coat. This helps both create volume and length.
 Just the eyes picture above ^^
 Products used ^^
Friday, March 25, 2011
Product Review: Matrix Biolage Colortherapie Shielding Shine Mist
 Another review! But, this one is for hair stuff! My obcession isn't limited to just makeup, I love anything beauty-ish. Hair is no exception. I bought this as I already love biolage color care shampoo and conditioner to extend the life of my red color.
Claims: This claims to provide some UV protection to your hair as well as making it smooth and shiny (even reducing frizz).
Price/Where to buy: I bought mine at Ulta and unfortunately, Ulta doesn't list biolage online. It seems to go for about 15.77 at wal-mart online. I am not sure if you would find it at your local wal mart, though. Any store that carries salon products like Ulta or Trade Secret should have it.
Packaging: It comes in a pump that is similar to one that you would use for hairspray and you get a lot for your money as you only need a pump or two per use.
Smell: It smells like a Pina Colada! It has that typical sunblock coconut type smell, which I love. But, if you're not into that, you may want to stay away. I will say that once you spray it on your hair, the scent dissipates. So, if you want to try but don't want your hair smelling like a tropical bar, I can tell you, it won't.
Review of the Claims/General Impression: I love this stuff! I can't believe I just re-discovered it. I recently found that the ends of my hair were looking kinda frayed, and it's most likely do to all the color I put in it. I needed something that would smooth the ends out. I had originally bought this with the intention of only using it when I'm out in the sun for long periods of time (which rarely happens), thinking the UV protection would be nice. I started using it again recently when I discovered that the ends of my hair were looking ragged.
This product smooths out those rough ends, gives my hair shine, and also gives me some comfort knowing my hair is protected from the sun when I'm outside. I would recomend this to anyone with color treated hair who is worried about fading. I would also reccomend it if you suffer with minor frizz or want something to make your hair shiny.
The only downside is that this will make your hair oilier at a faster rate. I wouldn't say using for the past two days has made my hair super oily but that it has made it slightly more oily than usual. I think the best thing to combat this is by using it sparingly. You don't need a ton! Just a spray or two.
LOVE!
Thursday, March 17, 2011
St. Patrick's Day look using MAC, Urban Decay, and NYX
What will you need?
1. Eye primer
2. cream shadow base in white/neutral and green
3. Three green shades: bright, midtone, and dark.
4. a matte, black shadow
5. black liquid eyeliner, black pencil eyeliner, green pencil eyeliner
6. shader brush, crease brush, blending brush, regular eyeshadow brush, pencil shadow brush
7. Bottle of water for pigments (if you use any)
8. of course........mascara
1.) Prime the lid. I'm using E.L.F.'s eyeshadow primer for one dollar at target!! It's pretty darn good stuff. I wouldn't say it is as good as urban decay primer potion or NYX's HD eyeshadow primer (I consider these two equivalent) but it's aaaaaalllllmost as good. It shows signs of wear about an hour or two earlier than the previous two I listed.

2.) Apply a cream shadow base to the lid in green. I'm using NYX's jumbo eye pencil in rocky mountain green. Apply this from lashes to crease (not into crease but up to it). Take a light white color and apply to the brow bone at this time also (highlight).
 3.) Apply the green midtone color to the lid. Here, I'm using a MAC pigment in antique green. I ALWAYS apply pigments wet, no exceptions. It gives you the best, vibrant color of the pigment. This is no exception. Spray that shader brush with water, grab the green pigment, and apply all over the cream shadow base on the lid. Below, I have the picture of the MAC pigment I used.
 4.) Now, take the deepest green color and apply it to the crease (using a crease brush). I'm using 'libertine' from Urban Decay's black palette. The color is a green that's very dark (dipped in black) and pictured at the bottom right of the palette. The black palette is one of my favorites from UD and probably gets the most use of all their palettes. I'm also going to use the matte black, 'black dog' in this look. I use this palette almost everyday mostly for no other reason than that one, perfect, matte black. The palette can be purchased only at sephora, btw.
  Front of the palette pictured below...
 5.) Apply a bright colored shadow/pigment right below the arch of the brow over the white cream base. I'm using NYX's pearl pigment in 'pearl'. These pigments are cheap (I bought mine for 1.99 each) and they are freaking awesome! They apply great, stay on, and look vibrant. I highly, highly, reccomend. Again, I'm using a wet shader brush to loosely apply this. We'll blend it out in a minute.

6.) Now, blend the libertine in with a clean blending brush. Also, blend the pearl pigment into the crease color to allow for transition. Apply more libertine if need be and keep blending until you get a good look.
10.) Line the lower waterline with a black liner. I'm using Physician's formula Shimmer strips liner in black. I also like Urban Decay's 24/7 liner in Zero, as well as L'oreal's HIP black chrome eyeliner for this purpose.
 12.) Curl lashes and apply mascara. I'm currently loving L'oreal's voluminous million lashes with Maybelline's lash stiletto on top. (volumizing for the first coat then legthening for the second is a winning combo).
And....the finished look......


Essie: Sand Tropez Swatch and Review
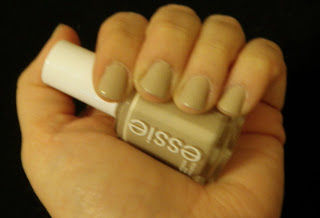
I have always been a big fan of bright or dark nail polishes but I have been wanting to try the nude polish trend and Essie had the perfect color: Sand Tropez. I thought I'd like the color but I didn't realize how much. I love this color. It almost blanks out my nails against the pale color of my skin. It's pretty neat; I welcome the change from my traditional polish selections. the picture below if of the bottle.

As far as the polish application and the polish itself, Essie holds up to OPI in quality. The polish applied smoothly and evenly. I always top it off with a fast dry top coat, so I can't say a whole lot for the drying time. Also, I noticed that in my second day of wear, it chips less than a brand like China Glaze. So, overall, Essie is a winner in my book. CVS and Target have a good selection of shades to try out and I think I will definately purchase again.
 The label for the color. Sand Tropez.


