Thursday, February 10, 2011

Jesse's Girl Eyedust: Applying pigments wet!

So, I like color, most of you know that if you know me. However, though it may be hard to believe, I've never applied my minerals/pigments wet! So, I decided to do that today. I love Jesse's Girl eyedusts as the best cheap pigments, but I've had them fade/crease without using adequate primer/base so I decided to see how they would do wet. All the products used in this tutorial are drugstore and therefore pretty affordable. You can get great color for a small price!!! (Jesse's Girl can be found at Rite Aid and online)

Lets get to it..........


This is the finished look on my eyes. The look is a green/blue/black mix. Not too dark, more bold.


The finished look overall.


So, to start, of course, always use a primer. Any primer will work. For the eyedusts (and bare minerals loose shadows), I use BOTH a primer and a cream shadow for extra staying power. This did prevent the Jesse's girl from creasing, btw. I use the skin tone pink here in the Revlon Illuminance cream pallette.


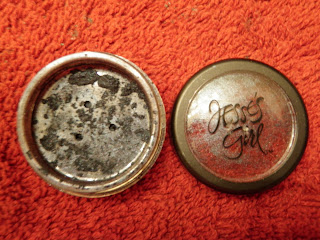
Unfortunately, once you open the package of Jesse's girl, you loose the color name! I believe this is called 'majestic green'. This is how the outside of the packaging looks.
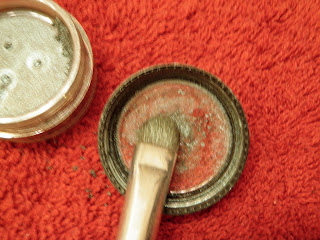


To apply loose pigments, place some color in the lid and then dip your brush into it. You can use a brush specially designed for loose shadow (bare minerals line) or any stiff shadow brush. Here, I'm using the E.L.F. eyeshadow brush.


To apply the shadows wet, the easiest technique is to buy an empty sprayer bottle (at target or anywhere else) and use it to spray the brush with water. I give the brush two sprays only so I don't overwet the brush and then pack on the shadow. Pat the shadow on, don't rub. If you need more color, redip the brush -> you shouldn't have to rewet again.


Now for the crease color. I've chosen "blackstar blue" from Jesse's girl (i just happened to remember that name for some reason). We will apply this dry since it's going into the crease. I used my Essence of Beauty crease brush to pick up the color.

Pick up the color as you do with any other mineral -> place color in lid, tap of excess and apply to crease and outer corner.


Now, blend the crease color out and blend it into the green a bit. I'm using my Kat Von D clean crease brush to blend.


I'm turning to Wet N' Wild's sweet as candy color trio for the browbone color. I'm using the lightest color in this pallette for the browbone.
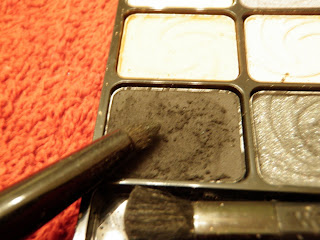


I always like a little extra depth, so I'm using my essence of beauty brush (came in the crease brush duo set -> this one is smaller than the other crease brush I use). The reason I'm using the smaller crease brush is for precision; I just want the matte black in the outer V and it's easier to use a smaller brush for this application. The color I'm using is the matte black in Wet N' Wild's Greed pallette.


Now, I line my eyes with liquid liner everyday. Again, you don't have to use liquid; you can use a gel or pencil. However, a liquid or gel will show up better against the colors we used. I'm using maybelline's ultra liner for this. I wing out the liner just a little on the upper lashline only.


For the lower lashline, liquid is typically too harsh. So, I'm using two colors. For the outer 3/4 of the lower lashline, I'm using L'oreal HIP's color chrome eyeliner. This is just a black eyeliner but I like HIP for staying power.


For the inner 1/4 of the lower lashline that is yet unlined, I'm using Revlon's colorstay liner in Teal.


I want to reinforce that pencil eyeliner to make it stay longer, so I'm using the same matte black I used before from Wet N' Wild's Greed pallette to place over the liner. For lining with shadow, my favorite brush ever is Bare Minerals Soft focus liner brush. These brushes are made to place shadow on the lashline so they are tops for this purpose. I only apply the black to the portion of the lower lashline that we used the black pencil for.


To finish off the look, I use Revlon's super lustrous lip gloss. The color I'm using is in 'pink whisper' (see below). I LOVE revlon's super lustrous glosses. I'd compare the super lustrous to the high end bare minreals glosses I own.


Wednesday, February 9, 2011

The best of Cheap!!

I've been wanting to do this for a while now. I've always appreciated the quality of high end products and I still do. However, in the past, I feel I've underestimated the quality and potential of cheaper products. I've written off cheap items as not having quality do to the lack of an inflated price. I have discovered recently, that If you read reviews and look hard enough, you will find those drugstore gems for great prices. What I'm doing with this post is comparing my favorite drugstore products to my favorite high end products of similar type. Let me know if you have anything to add to this list!

It all started with a $1.00 eyshadow brush from E.L.F.......

FOUNDATION
Best high end: Bare Minerals

Best Drugstore: Revlon Colorstay ties with Revlon Photoready

CONCEALER
Best High End: Merle Norman Coverup

Best Drugstore: Covergirl smoothers concealer (redness)
Maybelline 24 hour superstay (undereye circles)

EYESHADOW BASE:
Best High End: Urban Decay Primer Potion

Best Drugstore: L'oreal Decrease (in fact, I'd call decrease a dupe for UDPP)

BRIGHT EYESHADOW:
Best High End: Urban Decay (entire line)

Best Drugstore: Wet N Wild

EVERYDAY EYESHADOW:
Best High End: Too Faced Natural Eye Pallette

Best Drugstore: NYX champagne and caviar pallette

LOOSE EYESHADOW:
Best High end: Bare Minerals (entire line)

Best Drugstore: Jesse's Girl Eyedusts

GLITTER:
Best High End: Urban Decay's midnight cowboy line

Best Drugstore: NYX candy glitter liner and cream pallettes

MASCARA:
Best High End: Buxom Lash mascara in black

Best Drugstore: Maybelline's Lash Stilletto and L'oreal Voluminous Million Lashes

LIPGLOSS:
Best High End: Buxom and Bare Minerals lip gloss

Best Drugstore: Revlon super Lustrous lip gloss

BRONZER:
Best High End: Too Faced in Snow Bunny

Best Drugstore: Physician's Formula Happy Booster

NAIL POLISH:
Best High End: OPI (entire line) -> my favorite color is lincoln park after dark

Best Drugstore: Sinful Colors (avaliable at Walgreens)

MAKEUP BRUSHES:
Best High End: Merle Norman ( my foundation brush has lasted for 7 years!) and Kat Von D (sephora only)

Best Drugstore: E.L.F. ,Sonia Kashuk (Target for both), and Eco Tools

EYELINER:
Best High End: Urban Decay 24/7 glide on eye pencils and Buxom liners

Best Drugstore: NYX jumbo eye pencils, E.L.F. liquid liner, physicians formula shimmer strips liners.

MAKEUP SETTING SPRAY:
Only one and it's high end: Urban Decay All Nighter setting spray

FOUNDATION PRIMER:
Best High End: Bare Minerals Prime Time

Best Drugstore: L'oreal Magic Pefecting Base

PALLETTE:
Best High End: Urban Decay's Naked Pallette

Best Drugstore: Wet N Wild's color Icon pallettes *favorite is Lust*

PERFUME:
Best High End: Viva La Juicy

Best Drugstore: Britney spears circus fantasy

Makeup Organization for Small Bathrooms

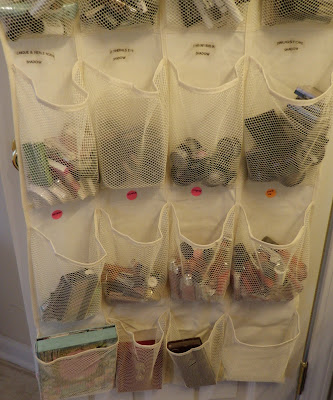
So, recently, I found that my makeup collection was kinda all over the place and not easy to access. My idea was to use an over the door shoe holder to organize everything so that it would be easy to access and grab what I need. I don't mean to pat myself on the back or anything but this was a great idea! Our master bathroom is small and only has one sink. The actual bathroom itself is also small and doesn't have enough room for any extra cabinets or drawers. All the space under the sink is already pretty full, so that wasn't an option either.
I encourage people to use this method if they are short on space but even if you have a large bathroom, this method is still awesome because everything is in one place and the pockets are see-through. I get ready everyday right behind this door as it's where the vanity is; so, I love this.


So, as you can see from the picture above, I organize items into pockets. Example: for eyeshadows, I have a drugstore eyeshadow pocket, a prestige eyeshadow pocket, a pigment pocket, an eyedust pocket. I also have a pocket for glitter only. At the bottom, I have pallettes stored in the larger pockets.


Here, you can see, I have a pocket for eyeliner, one for cream shadows, one for bases, etc.... You can organize your products any way you wish; this is just how I've chosen to organize mine.

Saturday, February 5, 2011

L'Oreal Infalliable lip gloss: A Review

So, I must admit that up until recently, I had written off drugstore lipglosses thinking they couldn't possibly be as good as the high end stuff. But, when I saw positive reviews of L'oreal Infalliable's lipgloss, I decided to try it. The claim of this is that it lasts for 6 hours. This claim is another reason I was hesistant-> typically long lasting lip products function more like a stain or are sticky when you apply them.
L'oreal's infalliable does last; I wouldn't say it lasts for 6 hours, but it does have pretty good staying power. Plus, it's not sticky or stain like. I would compare this to Buxom on the higherend. But, unlike Buxom, this doesn't plump. I like Buxom so much because they provide great color and stay on well.


So, the color I picked up is 'petal'. I also have a browny color of the same brand; however, petal is my favorite. In fact, I like this stuff so much, it holds a place in my purse. A product has to be pretty good to get to stay in my purse full time. :-)


The packaging is pretty good also. It has a doe foot applicator and goes on easily. Overall, I do reccomend this product. I encourage others who are like I am, to branch out into drugstore glosses as you can find some real gems that remained as yet undiscovered.

Wednesday, February 2, 2011

Completely Bare: A Bare Minerals Tutorial

This look is done with only bare minerals eyeshadows and the overall look includes a bare minerals lip. For anyone not familiar with, or have never purchased, a bare minerals shadow, I will say this: They are great eyeshadows, they last forever, and the color is very pure. The only downside to bare minerals eye products is dealing with the fact that they are loose and that can be frustrating if you are new to pigments. The most important thing is that you MUST use a primer and you need to pat the eyeshadow on (don't sweep or rub). If you don't pat the eyeshadows on, you will have shadow all over your face. As with other bare minerals products, I believe that once you master the learning curve, you can realize the true beauty and awsomeness of the line. :-)


As I noted earlier, a primer is a must to keep the loose shadows in place!! You can use any eyeshadow primer, but, I'm going with Urban Decay Primer Potion (my favorite high end primer). I reccomend buying this in the professional size (as pictured above) as it's easier to get more primer out of the packaging.


Just for good measure, I'm also using a cream base over the primer. I use a cream shadow over primer when I'm dealing with eyeshadow that doesn't tend to 'stick' well OR If I need the eyeshadow to last for more than eight hours or so. My go to cream shadow pallette is pictured above, and it's Revlon's creme illuminance in Seashells. I use the peach colored shade that is positioned one from the right.


For the bare minerals eyeshadow application, I'm using a bare minerals brush. The one pictured is the Full tapered shadow brush. The bare minerals brushes are great for the bare minerals shadows because they are so dense and hold so much color. However, you can use any eyeshadow brush for this (such as the E.L.F. $1 brush).


For the lid color, I'm using bare radiance (pictured above both open and closed). Now, bare radiance is categorized as an all over face color (a.k.a. blush) by bare minerals. I thought it was pretty, so I decided to use it as a shadow. To apply, pick up color with your eyeshadow brush, either by placing color in the lid or by lightly dipping brush into color. Make sure to tap your brush off so that all excess color drops off, giving you a brush with just enough color for your eyes. To apply, TAP the brush to lid and keep tapping until you have covered the entire lid.


For the crease color, I'm using bare minerals 'quickie shadow' brush. It's small and tapered, making it easy to get color in the crease. Again, however, you can use any crease brush.


I'm using bare minerals shadow in 'tiramisu' for the crease color. This is a nice taupe color. Again, pick up color the same way we did with bare radiance and blend into crease. I would tap on the outer edges of the eye to and then sweep into the crease to avoid color fallout.


Now, blend the tiramisu with the bare radiance. All blending when using bare minerals should be with a light hand. The really awesome thing about the loose shadows is that they are very easy to blend and it doesn't take a lot to do the blending. I'm again using the Kat Von D eye crease brush for this.


If you are satisfied with the look up to here, you can skip this step. But, for extra dimension in the outer lid, I'm using a deep purple shadow in the color 'kir royale'. I use the quickie shadow brush to pat this in the outer corner of the eye and the first outer half of the lower lash line as well as placing the color slightly into the crease. After application, grab the blending brush again and blend that into the tiramisu.


For the highlight, I'm again using my smashbox tapered shadow brush.


The highlight color I'm using is 'light show' by bare minreals. Grab that with the tapered shadow brush (or any eye shadow brush) and place that in the crease. Again, tap to place the color and then blend with the shadow brush; be careful not to 'erase' your crease color.


For the liners, I'm still sticking with the Bare Minerals line. However, bare minerals only recently started making pencil liners as they used liner shadows in the past. So, due to this change, I typically prefer the Buxom line. Buxom is a bare minerals brand (owned by and manufactured by the same company); however, you can only find Buxom liners at Sephora. Don't ask me why....I don't get it either since they sell other Buxom products at bare minreals botiques.


The liner colors I'm using are Onyx and Amethyst. Place Onyx to the entire upper lashline and outer lower lash line (place from outer corner to mid eye) and then place Amethyst to the inner lower lash line. Blend them, together and smudge if you want, but do it fast! These liners set and then don't move. I do really love the Buxom liners so much!


Still sticking with the Bare Minerals line, I'm using Bare Minerals Flawless Definition volumizing mascara. I think this is a pretty good mascara but I don't advocate for spending lots of money on their mascaras. I feel that lots of drugstore mascaras are just as good. The exception is the Buxom line mascara. I love that mascara -> It is my favorite of all time. I cannot seem to find a mascara as good as the Buxom mascara but that won't stop me in my quest to try.


For the lip, I'm using Buxom again. The buxom gloss line is my favorite of all high end glosses. It does 'plump' lips, so it feels cool and a little tingly when you apply it but be assured that this is normal! My favorite color of buxom gloss is pictured above -> the color is 'princess'. Again, I cannot say enough good about Buxom glosses. I definately give my blessing on anyone wanting to purchase.


This is the eye finished look. You can see that the colors are well blended and the look is a more natural one.

Finished look put all together!! I liked it a lot! Thanks for the request from brs.momma for the look. Keep the requests coming. I love being challenged. Request brands, looks, reviews, whatever -> just keep them coming!